
Main Courses
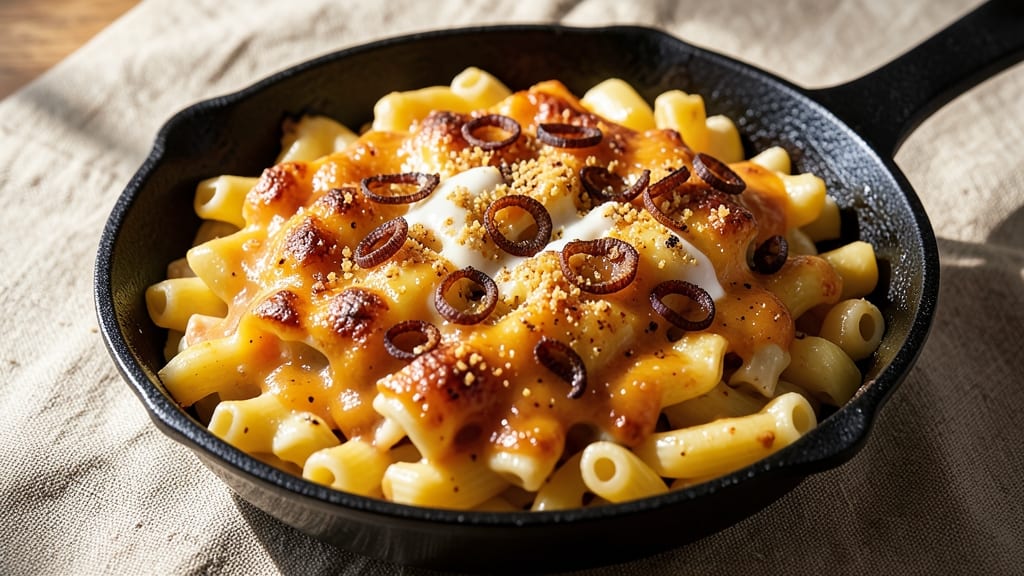
The African American baked mac and cheese recipe brings comfort and tradition to every bite, with its signature crispy breadcrumb topping and rich, velvety cheese filling. This dish isn’t just food—it’s a celebration of heritage, handed down through generations with love and care.
The combination of sharp cheddar, buttery pasta, and a golden crust makes it a staple at family gatherings and Sunday dinners alike.
What sets this recipe apart is the balance of textures and flavors—creamy, cheesy layers topped with crispy, buttery crumbs that add just the right crunch.
The secret lies in the slow stovetop cooking and proper baking technique, ensuring the mac and cheese is tender yet sturdy enough to hold its shape. Whether you're making it for a crowd or a cozy weeknight meal, this dish delivers warmth and satisfaction every time.
This version stays true to its roots while offering modern twists, like smoked cheddar for depth or a vegan adaptation using plant-based cheese. The crispy topping isn’t just for show—it’s the finishing touch that elevates this classic dish to restaurant-quality status.
Perfect for pairing with collard greens, cornbread, or a simple side salad, this mac and cheese is a true comfort food masterpiece.
Ready to recreate this soul-warming tradition in your own kitchen? The steps are straightforward, and the results are unforgettable. Let’s get started on a dish that’s as much about love and memory as it is about flavor.
Ingredients for african american baked mac and cheese
Classic comfort food ingredients that bring tradition to your table with every bite.
| Ingredient | Amount | Notes |
|---|---|---|
| Elbow Macaroni 🍝 | 1 ½ lbs | Medium or small shape preferred |
| Sharp Cheddar Cheese 🧀 | 2 cups | Shredded, block preferred |
| Smoked Cheddar Cheese 🧀 | 1 ½ cups | Shredded, for depth of flavor |
| Heavy Cream 🥛 | 1 cup | Full-fat for richness |
| Butter 🧈 | ½ cup | Unsalted, cut into small pieces |
| Whole Milk 🥛 | 1 cup | Warmed for smooth sauce |
| All-Purpose Flour 🌾 | 2 tbsp | For thickening sauce |
| Yellow Onion 🧅 | 1 whole | Medium, finely diced |
| Garlic Cloves 🧄 | 3 cloves | Minced, fresh preferred |
| Salt 🧂 | 1 ½ tsp | Kosher or sea salt |
| Black Pepper 🌶️ | ½ tsp | Freshly ground preferred |
| Panko Breadcrumbs 🍞 | 1 cup | For crispy topping |
| Dried Mustard 🌶️ | 1 tsp | For subtle tang |
| Paprika 🌶️ | ½ tsp | Smoked for color |
The cheeses are the soul of this dish. Sharp cheddar gives that signature tang, while smoked cheddar adds depth—don't skip it. Grab a block of each and shred it yourself (pre-shredded gets clumpy). Whole Foods or your local grocery store usually carry the good stuff. For the pasta, De Cecco or Barilla hold up best during baking. The butter matters too—use unsalted so you control the seasoning. I always buy extra because it makes everything taste better.
No sharp cheddar? Extra sharp white cheddar works in a pinch, but trust me, the flavor difference is worth it. Short on smoked cheddar? Add a dash of liquid smoke to regular cheddar (about 1/4 tsp)—it's a sneaky trick I picked up from my grandma. For the breadcrumbs, Panko is non-negotiable for crispiness. No Panko? Toast regular breadcrumbs in a dry pan for 2-3 minutes first. The mustard adds a little kick—skip it if you're sensitive to tang, but I always keep it in.
This dish tastes even better the next day, so make a big batch. Store leftovers in the fridge for 4-5 days, covered tightly. For freezing, portion into individual servings—3 months max. The crispy topping gets soggy if you reheat it, so I always make a fresh batch when serving leftovers. Pro tip: Keep the shredded cheese in the freezer in a sealed bag—it stays fresh for 6 months and saves you from buying it too often.
Why You'll Love This Recipe
- Here’s what sold me: it’s ridiculously affordable but feels fancy. A bag of elbow mac, a couple blocks of cheddar, some butter, and heavy cream—that’s it. No specialty ingredients, no markup. Plus, it stretches easily—double the batch, freeze half, and you’ve got a $5 meal for another night. That’s my kind of smart spending.
- One-Pot Wonder: I swear by this recipe because it’s literally one pot. No fussing with multiple bowls or strainers—just toss the macaroni, melt the butter, stir in the cheeses, and let the oven do the work. That smoky cheddar blend? It melts into a glossy, golden blanket over the noodles without a single clump.
- Smoky Cheese Magic: Between us, this isn’t your basic mac and cheese. The sharp cheddar gives it that sharp bite, while the smoked cheddar adds this deep, almost campfire-like richness. Honestly, the first time I tasted it fresh out of the oven, I nearly burned my tongue waiting for it to cool—so good it’s reckless.
- Weeknight to Potluck: I make this for lazy Tuesdays when I’m too tired to think, but it also slays at family gatherings. Bring it to a holiday dinner, and suddenly you’re the hero who fed everyone without stress. (Yes, even on a Tuesday night.) The leftovers? Still creamy and delicious reheated—no soggy noodles here.
Step-by-step instructions for soul-warming crisp-top baked mac and cheese
Here's how to make that perfect cheesy casserole with a golden, crispy topping.
Cook the Elbow Macaroni to Al Dente Perfection
Bring a large pot of water to a rolling boil and add 1.5 lbs elbow macaroni. Stir immediately to prevent sticking. Cook until 1 minute shy of the package directions for al dente—you want the pasta to have a slight bite. Drain the pasta in a colander, but don't rinse it. The starch on the pasta helps create that creamy sauce we're after.
While the pasta cooks, I like to prep the other ingredients. This keeps the process moving smoothly and prevents any last-minute scrambling. The reason we don't rinse the pasta is simple: that starchy water is what makes the sauce cling to each noodle perfectly. Trust me on this one—it makes a difference.
Build the Creamy Cheese Sauce
In a large skillet over medium heat, melt the 0.5 cup butter until it's completely melted and foaming. Add the finely diced yellow onion and cook for 5-6 minutes until it's soft and translucent. Stir in the minced garlic cloves and cook for another 30 seconds until fragrant—this prevents the garlic from burning and adds depth of flavor.
Lower the heat to medium-low and sprinkle in the 2 tbsp all-purpose flour. Stir constantly for 1-2 minutes until the flour is fully incorporated and the mixture looks like wet sand. Slowly pour in the 1 cup warmed whole milk and 1 cup heavy cream, whisking constantly to prevent lumps from forming. Let the mixture simmer for 3-4 minutes until it thickens slightly.
Add the Cheeses and Seasonings
Remove the skillet from heat and add the 2 cups sharp cheddar cheese and 1.5 cups smoked cheddar cheese. Stir until the cheeses are completely melted and the sauce is smooth. If the mixture looks too thick, add a splash of milk to loosen it. Season with 1.5 tsp salt and 0.5 tsp black pepper, then stir in the 1 tsp dried mustard and 0.5 tsp paprika for that signature tang and smoky depth.
Now, add the drained elbow macaroni to the cheese sauce and toss everything together until every noodle is fully coated. The sauce should be rich and velvety, with no dry spots. If it's still too thick, add a little more milk—you want it to coat a spoon but still be spreadable. This is where the magic happens, so don't rush it.
Assemble and Bake for the Perfect Crispy Top
Preheat your oven to 375°F. Transfer the macaroni and cheese mixture to a 9x13-inch baking dish, spreading it evenly. In a small bowl, mix together the 1 cup panko breadcrumbs with 1 tbsp melted butter until evenly coated. Sprinkle this mixture evenly over the top of the macaroni and cheese, pressing down gently with the back of a spoon to help it adhere.
Bake for 20-25 minutes until the top is golden brown and the edges are bubbling. The center should still be slightly jiggly—this ensures the macaroni stays al dente. If the top browns too quickly, tent it loosely with aluminum foil for the last 5 minutes of baking to prevent over-browning.
Rest and Serve with Confidence
Remove the baking dish from the oven and let it rest for 10 minutes before serving. This resting time allows the cheese to set slightly and makes it easier to slice. The crispy topping will soften just a bit, but it'll still hold its structure. Serve warm with a side of crusty bread or a simple green salad to balance the richness.
Here's the thing—this dish tastes even better the next day, so if you have leftovers, don't stress. Store it in the refrigerator and reheat in the oven at 350°F for 15-20 minutes until warmed through. The flavors meld together beautifully over time, making every bite even more comforting and delicious.
Pro Tips For Making African American Baked Mac And Cheese
- Pre-Cook Macaroni Firm: I learned this the hard way—undercooked elbows turn to mush when baked. Boil them just 1 minute less than package instructions (about 6-7 minutes total), then drain and rinse with cold water. They’ll finish cooking in the oven while staying chewy, not gluey.
- Shred Cheese Coarse: Skip the food processor—big, uneven shreds melt better. Use your hands to tear the cheddars into chunks (sharp + smoked) or buy pre-shredded but toss it in a bowl and break up clumps. Tiny shreds burn and clump; big pieces create that perfect stretch.
- Don’t Overmix the Sauce: After adding the heavy cream and butter, stir just until combined—no need to whip it into submission. Overmixing makes the sauce thin and watery. A few lumps? They’ll melt away in the oven, giving you that creamy, velvety texture you actually want.
- Bake Low and Slow: Crank the oven to 350°F (not 375°F or higher) and bake uncovered for 20-25 minutes. The top will brown beautifully without burning, and the cheese will develop that rich, caramelized flavor. Watching it at 375°F? You’ll end up with a sad, overcooked crust.
Pro cooking tips for this recipe
Cheese Melting Secrets
For perfectly smooth cheese sauce, shred your own cheddar using a box grater—pre-shredded cheese contains anti-caking agents that make it clumpy. I like to mix sharp cheddar with smoked cheddar for that signature depth.
Start melting the cheeses off the heat at medium-low to prevent scorching. If the sauce looks too thick, add 1 tbsp milk at a time until it reaches a creamy, spoonable consistency. 🧀
Pasta Prep Matters
Cook your pasta just 1 minute shy of package instructions—it’ll finish cooking in the oven while baking. Never rinse the pasta after draining, as the starch helps create that velvety sauce. I like to toss the drained pasta with a little butter right away to prevent sticking.
For extra flavor, reserve ½ cup pasta water to thin the sauce if needed later. 🍝
Crispy Top Hacks
The secret to a perfect crispy topping is using Panko breadcrumbs mixed with 1 tbsp melted butter before sprinkling. Press it down gently with a spoon to help it adhere.
For extra crunch, broil for 1-2 minutes at the end of baking. If your topping browns too quickly, tent with foil for the last 5 minutes to prevent burning. 🍞
Oven Temperature Control
Bake at 375°F for even cooking—any hotter and the top burns before the center cooks. Use an oven thermometer to verify your oven’s accuracy (most run 25°F hotter than set).
For a deeper flavor, add ½ tsp smoked paprika to the breadcrumb topping. Let the dish rest 10 minutes before serving—this helps the cheese set and makes slicing easier. ⏰
Flavor Boosters
Add 1 tsp dried mustard to the cheese sauce for a subtle tang that balances the richness. For extra depth, stir in 1 tbsp hot sauce or a pinch of cayenne pepper before baking.
I also like to sprinkle crushed Ritz crackers on top for added texture. The key is to season gradually—taste as you go! 🌶️
Make-Ahead Magic
This dish tastes even better the next day! Assemble it up to 24 hours ahead and refrigerate uncovered to let the flavors meld. When ready to bake, add 5-10 minutes to the baking time.
For freezing, portion into individual servings and bake straight from frozen at 375°F for 30-35 minutes. The crispy topping will soften but still taste amazing. ❄️
Nutrition facts
Frequently asked questions
Can I use pre-shredded cheese in this recipe?
Pre-shredded cheese works in a pinch, but freshly shredded cheddar makes all the difference! The anti-caking agents in pre-shredded cheese can make your sauce grainy. If you must use it, add 1-2 tablespoons of milk to help smooth it out while melting. For best results, invest in a box grater for that authentic, creamy texture.
How do I make this recipe vegetarian or vegan?
For a vegetarian version, swap the butter for olive oil and use dairy-free cheese like Violife or Daiya. For vegan mac and cheese, replace all dairy with plant-based milk, vegan butter, and vegan cheese—brands like Miyoko's or Follow Your Heart work well. The key is to melt the vegan cheese off the heat to prevent burning.
Why did my mac and cheese turn out too dry?
Dry mac and cheese usually happens when the pasta overcooks or the sauce isn't creamy enough. Always cook pasta just 1 minute shy of package time and use reserved pasta water to loosen the sauce if needed. For extra moisture, stir in 1-2 tablespoons of milk or cream before baking.
Can I make this recipe in a slow cooker?
Yes! Cook the pasta separately, then combine it with the cheese sauce in your slow cooker on low heat for 1-2 hours. Stir occasionally to prevent sticking. For the crispy topping, sprinkle breadcrumbs on top and broil for 3-5 minutes at the end. This method keeps the pasta tender while melting the cheese evenly.
What's the best way to reheat leftovers?
Reheat in the oven at 350°F for 15-20 minutes covered with foil to prevent drying. For microwave reheating, cover with a damp paper towel and heat in 30-second intervals, stirring between each. The crispy topping won't be as crispy when reheated, so I recommend making a fresh batch when serving leftovers.