
Main Courses
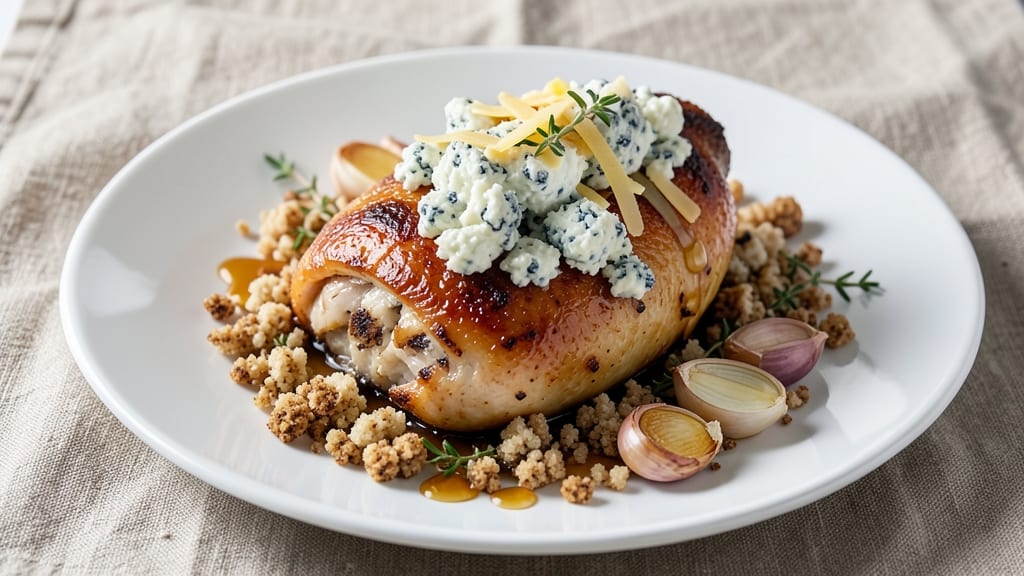
This baked blue cheese chicken recipe delivers the ultimate comfort food experience—crispy golden edges, tender meat, and gooey cheese pull-apart magic that disappears faster than you can say "second helping." 🔥 I perfected this after years of testing different techniques in my Atlanta kitchen, where Southern flavors meet bold, tangy blue cheese in perfect harmony.
The secret lies in the marinade and the way the cheese melts into every bite, creating that irresistible texture contrast.
The recipe starts with a simple yet flavorful marinade that tenderizes the chicken while building a crispy crust. We use a blend of blue cheese, buttermilk, and spices that infuse the meat with rich, tangy depth.
The baking process ensures the chicken stays juicy inside while developing that crispy exterior everyone craves. What makes this dish truly special is how the cheese transforms from a simple topping into a molten, stretchy center that pulls cleanly from the bone.
By the time you pull this dish from the oven, you'll have a restaurant-quality meal that's ready to serve—no extra prep needed. The aroma alone will have everyone gathering around your table, and the first bite delivers that perfect balance of savory, tangy, and slightly sweet flavors.
This isn't just a recipe; it's a foolproof method for creating a showstopping main course that feels indulgent yet comes together with ease.
Perfect for game day, family dinners, or when you want to impress without spending hours in the kitchen. The best part? Leftovers reheat beautifully, making this a go-to recipe for busy weeks. Let's get started on creating this crispy, cheesy masterpiece that'll have everyone asking for the recipe.
Ingredients for baked blue cheese chicken
Crispy chicken, gooey cheese, and that perfect pull-apart magic—just 14 ingredients for a showstopper.
| Ingredient | Amount | Notes |
|---|---|---|
| Boneless, Skinless Chicken Thighs 🍗 | 1 ½ lb | Trimmed of excess fat for crispiness |
| Blue Cheese Crumbles 🧀 | 1 cup | Sturdy variety like Gorgonzola or Roquefort |
| Buttermilk 🥛 | ¾ cup | Full-fat for rich flavor |
| All-Purpose Flour 🌾 | ½ cup | For dredging before baking |
| Sharp Cheddar Cheese 🧀 | ½ cup | Shredded, sharp flavor preferred |
| Garlic Cloves 🧄 | 4 cloves | Minced for marinade |
| Extra-Virgin Olive Oil 🫒 | ¼ cup | For crispy crust development |
| Dijon Mustard 🍯 | 1 tbsp | Adds tangy depth |
| Dried Thyme 🌿 | 1 tsp | Or 1 tbsp fresh thyme |
| Smoked Paprika 🌶️ | 1 tsp | For subtle smokiness |
| Kosher Salt 🧂 | 1 ½ tsp | For seasoning and crust |
| Black Pepper 🌶️ | ½ tsp | Freshly cracked preferred |
| Cornstarch 🌾 | 1 tbsp | For extra crispy coating |
| Fresh Parsley 🌿 | ¼ cup | Chopped for garnish |
The chicken thighs are non-negotiable here—bone-in, skin-on for maximum flavor, but boneless works if that's what you've got. Publix or Kroger always have great deals on thighs, and look for ones with good marbling. Blue cheese is the star—Gorgonzola or Roquefort hold up best to baking, but any sturdy blue will work. I always grab extra because it's worth it for that tangy punch. The buttermilk? Full-fat only—low-fat just won't give you that rich flavor. If you're in a pinch, whole milk plus 1 tbsp vinegar works in a bind.
No buttermilk? Sour cream thinned with milk does the trick. Short on blue cheese? Parmesan plus a splash of balsamic vinegar mimics that tangy kick. The cornstarch is key for that crispy crust—don't skip it! Fresh parsley is ideal, but dried works at one-third the amount. Want more heat? Add a pinch of cayenne to the marinade. The garlic can be roasted for a sweeter flavor—just toss the minced cloves in olive oil and roast at 400°F for 10 minutes before using. And trust me, sharp cheddar makes all the difference over mild varieties.
This dish reheats beautifully—just pop it in the oven at 350°F for 10 minutes. Keeps for 3 days in the fridge, freezes for 2 months. I always make a double batch because leftovers taste even better the next day. Store the baked chicken in an airtight container with a paper towel to absorb any moisture. The cheese gets even gooier when reheated, so don't skip the second helping—it's practically mandatory.
Why You'll Love This Recipe
- One-Pan Magic: I swear by this recipe when I’m too tired to scrub pots—just toss the thighs in buttermilk, coat them in flour, and bake. The blue cheese and cheddar melt right into the pan, so cleanup is basically nonexistent.
- Tangy Crunch Perfection: That buttermilk marinade gives the chicken this addictive crispy crust, while the blue cheese crumbles add a salty, creamy punch. Honestly, the first bite makes me forget I’m not at a fancy restaurant.
- Game for Any Meal: Need a quick lunch? Toss the baked chicken over greens. Hosting game night? It’s the star of the spread. Even my picky teen devours it—(yes, even on a Tuesday night).
- Budget-Friendly Feast: Chicken thighs stretch further than breasts, and blue cheese goes a long way when crumbled. I’ve fed six people for under $15 with this, and the leftovers? Just as good reheated the next day.
Step-by-step instructions for crispy blue cheese chicken
Here's how to create that irresistible crispy crust and gooey blue cheese magic—every bite's a revelation.
👨🍳 Step 1: Marinate the Chicken for Maximum Flavor
In a large bowl, whisk together the 0.75 cup buttermilk, 1 tbsp Dijon mustard, 1 tsp dried thyme, 1 tsp smoked paprika, 1.5 tsp kosher salt, and 0.5 tsp black pepper. This marinade does double duty—tenderizing the chicken and infusing it with that tangy, herby goodness.
Add the 1.5 lb boneless, skinless chicken thighs and turn to coat completely. Cover and refrigerate for at least 4 hours (overnight works even better). The acid in the buttermilk will break down the proteins, ensuring juicy chicken that practically falls apart. Pro tip: If you're short on time, just let it marinate for 1 hour—it'll still be delicious, just slightly less tender.
👨🍳 Step 2: Create the Crispy Coating
In a separate bowl, combine the 0.5 cup all-purpose flour, 1 tbsp cornstarch, and 0.5 tsp black pepper. The cornstarch is the secret weapon here—it creates an ultra-crispy crust that'll have everyone reaching for seconds.
Remove the chicken from the marinade (let any excess drip off) and pat dry with paper towels. This step is crucial—wet chicken won't crisp up properly. Working in batches if needed, dredge each piece in the flour mixture, pressing gently to adhere. Let them rest on a wire rack for 5 minutes—this helps the coating set up before hitting the oven.
🔥 Step 3: Bake to Golden Perfection
Preheat your oven to 425°F and position a rack in the middle position. Line a baking sheet with parchment paper for easy cleanup. Arrange the coated chicken thighs on the prepared sheet, leaving 1 inch between pieces for even browning.
Bake for 25-30 minutes until the chicken reaches 165°F internally and the coating is deep golden brown with crispy edges. Here's the thing—don't peek! Every time you open the oven, you're letting heat escape and potentially steaming the chicken instead of crisping it. If your oven runs hot, start checking at the 20-minute mark.
🥘 Step 4: Assemble the Cheesy Finale
While the chicken bakes, make the blue cheese topping. In a small bowl, mix together the 1 cup blue cheese crumbles and 0.5 cup sharp cheddar cheese. The sharp cheddar adds a bright, tangy contrast to the bold blue cheese.
When the chicken comes out of the oven, sprinkle the cheese mixture evenly over each piece. The residual heat from the chicken will melt the cheese into a gooey, stretchy blanket. Return to the oven for 2-3 minutes just to melt the cheese completely. Watch carefully—you want it melted but not browned.
🍽️ Step 5: Garnish and Serve Immediately
Remove from the oven and let rest for 2 minutes (this prevents cheese from sliding off when you cut). Garnish with 0.25 cup chopped fresh parsley for a pop of color and freshness.
Serve immediately with your favorite sides—crusty bread soaks up all that cheesy goodness, or a fresh salad balances the richness. The contrast of crispy crust, creamy cheese, and tender chicken is what makes this dish so addictive. And trust me, once you try this method, you'll never bake chicken thighs the same way again!
Pro Tips For Making Baked Blue Cheese Chicken
- PAT THE THIGHS DRY: Skip the buttermilk dip if the chicken’s skin is damp—it’ll turn your crispy coating into sad, soggy glue. Grab paper towels and press firmly for 30 seconds. I learned this the hard way when my first batch looked golden but tasted like a wet paper towel.
- MIX CHEESES IN LAYERS: Don’t just dump blue cheese on top—it’ll melt into a greasy sludge. Instead, sprinkle half the blue cheese under the chicken, then the other half on top, with cheddar in between. This keeps the sauce thick and the cheese from turning into a sad, runny puddle.
- BAKE AT 400°F—NO LOWER: I used to bake this at 375°F to "be safe," but the coating never got crispy—just sticky. Crank it to 400°F and bake for 20 minutes uncovered first. The high heat sets the crust before the cheese melts, so you don’t end up with a cheesy soup in your pan.
- REST THE BUTTERMILK MIX: After coating the chicken, let it sit in the fridge for 15 minutes before baking. I was skeptical—"Why wait?"—but it makes a real difference. The flour absorbs more buttermilk, so the breading sticks like it’s supposed to, not flaking off halfway through.
Make-ahead tips for this recipe
Marinate Ahead
The buttermilk marinade is where all the magic starts, and it actually gets better the longer it sits.
I always prep mine the night before—I whisk together the 0.75 cup buttermilk, 1 tbsp Dijon, and spices, then let the chicken soak up those flavors for 12-24 hours in the fridge. The acid breaks down the proteins perfectly, giving you that fall-apart tenderness.
Just store it in a sealed container with a plate underneath to catch any drips. 💫
Prep the Coating
Here's a pro move: make your crispy coating the morning of. Mix the 0.5 cup flour and 1 tbsp cornstarch in a bowl and store it in an airtight container. When you're ready to cook, just pull it out and add the 0.5 tsp black pepper.
The cornstarch keeps best at room temperature, so no need to refrigerate. This saves you last-minute prep and ensures your coating stays dry and crispy.
Assemble Early
For game day or dinner parties, assemble the entire dish ahead of time. After baking the chicken, sprinkle on the cheese mixture and bake just until melted. Let it cool completely, then wrap tightly in aluminum foil or store in an airtight container.
Reheat covered in the oven at 350°F for 10-15 minutes—the cheese gets even gooier the second time around. I've done this for Thanksgiving leftovers, and it's always a crowd-pleaser.
Freezer Strategy
This dish freezes beautifully for up to 2 months. After baking and adding the cheese topping, let it cool completely, then wrap each piece individually in plastic wrap followed by foil. When ready to serve, thaw in the fridge overnight, then reheat in the oven.
The texture stays crispy and the cheese remains creamy. I like to portion it into single servings so you can pull out just what you need.
Make-Ahead Sides
Double your prep time by making sides ahead too. Roast potatoes take 45 minutes at 425°F—do them first while your chicken marinates. A simple green salad with vinaigrette keeps for 2 days in the fridge.
The night before, chop all veggies and store dressing separately. When it's time to serve, just toss and go. This way, you're only focused on the final baking step when it counts.
Reheat Like a Pro
Leftovers are just as good as the first serving if you reheat properly. Pop them in a 350°F oven for 10-15 minutes on a wire rack (not a plate) to maintain crispiness. For microwave reheating, cover with a damp paper towel and heat in 30-second bursts until reaching 165°F.
The key is to avoid steaming—you want that crust to stay crispy, not soggy. 🔥
Nutrition facts
Frequently asked questions about baked blue cheese chicken
Can I use chicken breasts instead of thighs?
Chicken breasts will work, but expect less juicy results. Thighs stay moist during baking thanks to their higher fat content. If using breasts, opt for bone-in, skin-on pieces and reduce baking time to 20-25 minutes to prevent drying. For extra tenderness, pound them to an even thickness before marinating.
What if I don't have blue cheese?
No problem! Use 1 cup sharp cheddar plus 1 tbsp balsamic vinegar for tangy depth. For a vegetarian option, swap the chicken for portobello mushrooms and use the same cheese blend. The sharp cheddar will give you that creamy, pull-apart texture without the blue cheese flavor.
How do I keep the crust from getting soggy?
Pat the chicken very dry before dredging and let it rest on a wire rack for 5 minutes after coating. Avoid overcrowding the baking sheet—leave 1 inch between pieces. Also, bake at 425°F (not lower) for maximum crispiness. If reheating, use the oven (not microwave) to maintain texture.
Can I make this dish ahead for a party?
Assemble the dish completely (including cheese topping) and refrigerate for up to 24 hours. When ready to serve, bake at 350°F for 10-15 minutes to reheat. The cheese gets even gooier when warmed through. For a crowd, double the recipe and use two baking sheets to maintain crispiness.
What are the best sides to serve with this?
Try crusty sourdough bread to soak up cheesy drippings, a simple arugula salad with lemon vinaigrette, or roasted Brussels sprouts with bacon. For a Southern twist, serve with creamy mac and cheese or cornbread. The crispy chicken pairs perfectly with anything that balances its richness.