
Snacks
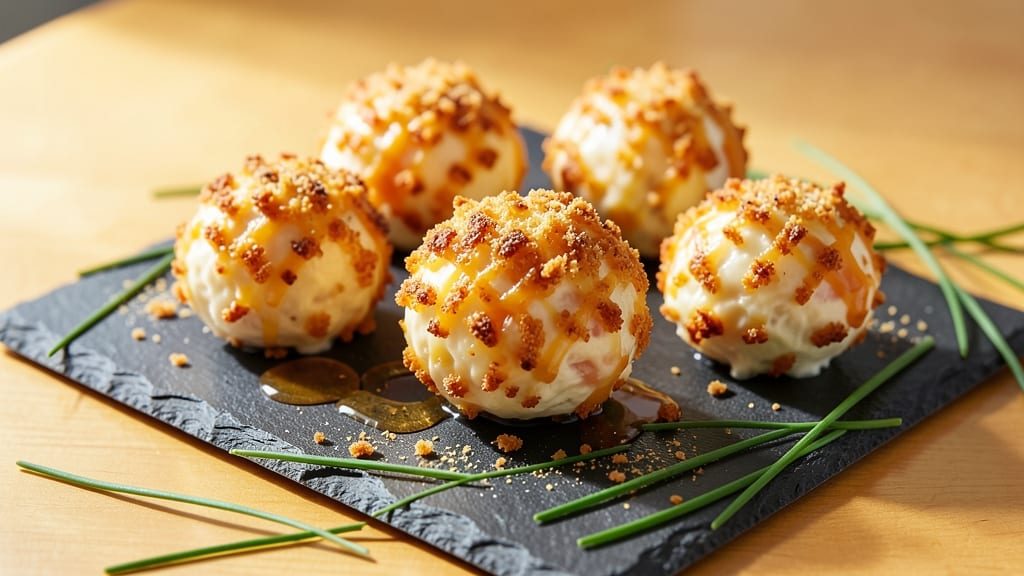
Baked cheddar cheese balls transform simple pantry ingredients into a snack that’s crispy on the outside, gooey on the inside, and impossible to resist. 🔥 The secret lies in balancing sharp cheddar with cream cheese for that perfect melt, then coating them in a crunchy breadcrumb shell that stays golden even after baking. I’ve perfected this recipe over years of testing—no soggy centers or bland flavors here.
This recipe delivers restaurant-quality results with just five key ingredients: shredded cheddar, cream cheese, breadcrumbs, and a pinch of seasoning. The baking process is straightforward—roll the mixture into balls, coat them thoroughly, and bake at 375°F for 12-15 minutes until they’re golden and bubbling.
The high heat ensures a crispy exterior while keeping the inside creamy and warm.
What makes these cheese balls truly special is their versatility. Serve them warm with marinara for dipping, sprinkle with jalapeños for a spicy kick, or add crumbled bacon for a savory twist.
The flavor is rich, tangy, and satisfying—perfect for game day, parties, or a quick snack when cravings hit. Each bite delivers that perfect contrast of textures and flavors.
Once you try these, you’ll never go back to store-bought versions. The recipe scales easily for crowds, and leftovers stay crispy at room temperature for days. Let’s get baking—your taste buds will thank you.
Ingredients for baked cheddar cheese balls
Five ingredients transform into golden, melty cheese balls that'll have everyone begging for more.
| Ingredient | Amount | Notes |
|---|---|---|
| Shredded Sharp Cheddar Cheese 🧀 | 2 cups | Aged 2+ years for sharpness |
| Cream Cheese 🧈 | 8 oz | Full-fat for creaminess |
| Panko Breadcrumbs 🍞 | 1 ½ cups | Light and crispy preferred |
| All-Purpose Flour 🌾 | ½ cup | For extra crunch layer |
| Garlic Powder 🧄 | 1 tsp | Freshly ground preferred |
| Onion Powder 🧅 | 1 tsp | For depth of flavor |
| Ground Black Pepper 🌶️ | ½ tsp | Freshly cracked for heat |
| Butter 🧈 | 2 tbsp | Melted for binding |
| Egg 🥚 | 1 whole | For extra binding |
The cheddar is everything here—aged 2+ years for that sharp, tangy bite. Kraft 2-Year Sharp is my go-to, but any sharp cheddar works. The cream cheese keeps things creamy, so full-fat is non-negotiable—low-fat makes them dry. Panko gives that perfect crunch, but if you've only got regular breadcrumbs, toast them first to dry them out. That extra flour layer? Trust me on it—it makes the coating stay crispy instead of turning soggy. Grab these at Walmart or Kroger for the best deals.
No panko? Crushed cornflakes or Ritz crackers work in a pinch—just make sure they're finely crushed. Short on cheddar? Add a little Monterey Jack for creaminess, but keep it mostly cheddar for that signature flavor. The egg is optional but helps bind everything together—skip it if you're vegan (use flax egg instead). For extra flavor, mix in a pinch of smoked paprika or cayenne. And if you're feeling fancy, add a splash of Worcestershire sauce to the cheese mix for umami depth.
These stay crispy for 3 days at room temperature if stored in an airtight container. For longer storage, freeze them on a tray first, then transfer to a bag—freeze for up to 3 months. Reheat in the oven at 350°F for 5-10 minutes to restore that golden crunch. Pro tip: Double the batch—they disappear fast, and leftovers make great gifts. Serve with marinara, ranch, or just eat them plain—they're that good.
Why You'll Love This Recipe
- No Mixing Madness: I swear by the "no hands" method—just toss the shredded cheddar, softened cream cheese, and a pinch of garlic powder in a bowl, then fold in the panko. No food processor, no stress, just three ingredients that come together like they were meant to.
- Crispy-Creamy Magic: That panko crust? It’s my favorite kind of contradiction—crunchy outside, gooey inside, with sharp cheddar cutting through the richness. The garlic powder adds this sneaky depth that makes it taste like it simmered for hours (but it didn’t).
- Party in a Bite: Between us, these are my go-to for game day, book club, or when I’m too lazy to make a full appetizer spread. They hold up in the freezer, reheat like a dream, and even my picky teenager sneaks them when he thinks I’m not looking.
- Budget Snack Hero: Sharp cheddar and cream cheese stretch farther than you’d think, and panko is cheaper than most pre-made cheese balls. I make a double batch, freeze half, and boom—no more emergency takeout when the munchies hit at 10pm.
Step-by-step instructions for baked cheddar cheese balls
Here's how to make these irresistibly crispy, melty cheese balls that'll disappear faster than you can say "extra cheese."
👨🍳 Step 1: Mix the Cheese Base
In a large mixing bowl, combine the 2 cups shredded sharp cheddar cheese and 8 oz cream cheese. I like to use my hands for this part—it's easier to feel when everything's fully incorporated. Work the cheeses together until you have a smooth, crumbly mixture with no visible cheese chunks. This takes about 2-3 minutes of kneading.
Here's the thing—don't overwork the mixture or it'll get greasy. You're looking for a texture that's soft enough to shape but firm enough to hold together. If it feels too sticky, add 1 tablespoon of the all-purpose flour at a time until it comes together nicely. The sharp cheddar should be noticeably tangy here, setting the stage for that perfect flavor explosion.
👨🍳 Step 2: Add Seasonings and Binding Ingredients
Create a well in the center of your cheese mixture and crack the 1 whole egg directly into it. Then add the 2 tbsp melted butter, 1 tsp garlic powder, 1 tsp onion powder, and 0.5 tsp ground black pepper. Using your hands again, gently fold everything together until just combined. You want to keep the egg mostly intact at first—it'll help bind the mixture when we add the dry ingredients.
This is where the magic happens. The egg adds moisture and binding power, while the melted butter creates that irresistible richness. The garlic and onion powders will infuse the cheese balls with subtle, savory depth. If your mixture feels too wet, add 1 more tablespoon of flour—just enough to make it hold together when you squeeze a small piece between your fingers.
🥘 Step 3: Incorporate the Crunchy Coating
In a separate bowl, whisk together the 1.5 cups panko breadcrumbs and 0.5 cup all-purpose flour. This dry mixture is your secret weapon for that perfect golden crust. Now, gently fold the dry ingredients into your cheese mixture using a silicone spatula. Be careful not to overmix—just combine until everything is evenly distributed and the dough holds together when pressed.
Here's a pro tip: If your dough feels too dry, add 1 more tablespoon of melted butter to help bind everything. The panko will give you that perfect crunch while the flour adds an extra layer of texture. When you roll a piece between your palms, it should hold its shape but still be pliable enough to form smooth balls. If it crumbles too easily, add just a touch more melted butter—1 teaspoon at a time—until it behaves.
🔥 Step 4: Form and Pre-Bake the Cheese Balls
Using your hands, roll the dough into 1.5-inch balls—about the size of a golf ball. I like to wet my hands slightly with water to prevent sticking, but don't overdo it or the dough will get soggy. Place the formed balls on a parchment-lined baking sheet, spacing them about 1 inch apart so they have room to expand.
Preheat your oven to 375°F while you work. Once the oven is ready, bake the cheese balls for 12-15 minutes until they're light golden brown on the bottom. Here's the crucial part: Don't walk away! You want them to just start browning—this sets the foundation for that perfect crispy exterior. They'll continue cooking and browning during the final bake, so pull them out when they're still slightly pale on top.
🔥 Step 5: Finish with the Perfect Crisp
Remove the cheese balls from the oven and let them cool for 2 minutes—just enough time to handle them without burning your fingers. Then, increase your oven temperature to 400°F. Return the baking sheet to the oven and bake for another 8-10 minutes until the cheese balls are deep golden brown and fully crispy on all sides.
This second bake is what transforms good cheese balls into extraordinary ones. Watch them closely toward the end—they should develop a beautiful golden-brown crust with some spots of deeper caramelization. The interior should still be soft and gooey, with just a hint of warmth from the oven. Serve them immediately while they're still piping hot, with your favorite dipping sauce on the side. Trust me, the wait will be worth it!
Pro Tips For Making Baked Cheddar Cheese Balls
- Microwave the Cheese First: I learned this the hard way—skipping this step makes the dough sticky and messy. Pulse the shredded cheddar and cream cheese in short bursts (15-20 seconds each) until just soft enough to mix, not melted. This keeps the texture smooth and prevents a greasy disaster when rolling.
- Chill the Dough Hard: Wrap the mixed cheese ball dough in plastic and refrigerate for at least 30 minutes—yes, even if you’re impatient. Cold dough rolls cleaner, holds shape better, and bakes more evenly. Trust me, your future self will curse you if you skip this.
- Press Panko Firmly: Don’t just sprinkle breadcrumbs—press them hard into the dough balls before baking. A light dusting means a weak crust that’ll crumble. Use your palm or a small plate to really pack it in, especially on the bottom where it matters most.
- Bake at 375°F, Not Hotter: After burning three batches at 400°F, I finally dialed it down. 375°F gives you a golden crust without turning the inside rubbery. Rotate the tray halfway through, and resist the urge to peek—opening the oven too soon steals heat and wrecks the texture.
Perfect pairings for this baked cheddar cheese balls
Dipping Sauces
Classic marinara sauce is my go-to pairing—its tangy acidity cuts through the richness of the cheese balls beautifully. I recommend Rao's Homemade Marinara from the store section for that perfect balance of sweetness and acidity.
For a creamier option, try ranch dressing—the buttermilk tang complements the sharp cheddar perfectly. 🍅
Looking for something spicy? Mix ½ cup sour cream with 1 tbsp hot sauce (I love Cholula) and a pinch of smoked paprika. This creamy, fiery dip elevates the cheese balls to next-level party status.
For a smoky twist, blend ¼ cup BBQ sauce with 2 tbsp Greek yogurt—sweet, tangy, and irresistible.
Crunchy Add-Ons
Top your cheese balls with crushed potato chips before baking for extra crunch—I love Ruffles Original for their perfect saltiness. Sprinkle ½ cup chopped green onions on top right after baking for a fresh, sharp contrast.
For a smoky flavor, mix 2 tbsp crumbled bacon bits with 1 tsp smoked paprika and toss them in the panko before coating the cheese balls.
Beverage Pairings
A crisp lager like Miller Lite or Coors Light cleanses the palate between bites of rich cheese balls. For something bolder, try a dry rosé—its acidity and subtle fruitiness balance the cheesy indulgence. If you prefer beer, a wheat beer like Blue Moon adds a refreshing citrus note. 🍺
Sweet Contrasts
Serve cheese balls alongside honey-drizzled apples for a sweet-savory combo that’s surprisingly balanced. I slice 2 apples into wedges, toss with 1 tbsp lemon juice and 1 tbsp honey, then sprinkle with cinnamon.
The crisp apple acidity refreshes your palate after each rich bite. For a dessert twist, pair with dark chocolate-covered pretzels—the salty-sweet contrast is pure magic.
Party Platter Ideas
Arrange cheese balls on a platter with pickled jalapeños for heat lovers and sliced baguette for dipping. Add cherry tomatoes and mozzarella pearls for a Mediterranean-inspired spread. For a game-day vibe, mix in buffalo chicken dip and spinach-artichoke dip**—this becomes an instant crowd-pleaser. 🏈
Nutrition facts
Frequently asked questions
Can I make these cheese balls ahead of time?
Form the balls and coat them in panko, then refrigerate on a parchment-lined tray for up to 24 hours. When ready to bake, increase the temperature to 400°F and bake for 15-18 minutes instead of the two-stage method. For even better results, freeze uncooked balls on a tray, then transfer to a bag for up to 3 months. Thaw overnight in the fridge before baking.
Why are my cheese balls soggy instead of crispy?
Soggy cheese balls usually mean too much moisture in the dough. Check if you used full-fat cream cheese (low-fat makes them dry but also soggy when baked). Also, ensure your breadcrumbs are dry—if using regular breadcrumbs, toast them first. The key is a 1:1 ratio of cheese to dry ingredients. If the dough feels too wet, add 1 more tablespoon of flour or reduce the egg to ½.
Can I use a different type of cheese?
Yes! For a milder flavor, swap ½ cup of cheddar for Monterey Jack. Want extra sharpness? Add ¼ cup of pepper jack. Avoid mozzarella—it's too soft and won't hold shape. For a smoky twist, mix in 2 tbsp smoked gouda. Just remember: sharp cheddar is the star—keep at least 1.5 cups of it for that signature tang.
How do I keep the cheese balls from sticking to the pan?
Line your baking sheet with parchment paper or use a silicone baking mat. If you don't have either, lightly grease the pan with cooking spray or melted butter. For extra insurance, chill the formed balls for 30 minutes before baking—the colder dough holds its shape better. And always space them 1 inch apart so air can circulate and prevent sticking.
Are these cheese balls freezer-friendly?
Yes! They freeze beautifully. After baking, let them cool completely, then store in a single layer on a tray. Once frozen solid (about 1 hour), transfer to a freezer bag with parchment between layers. Reheat from frozen at 350°F for 10-12 minutes until crispy again. They'll lose some crunch but still taste amazing—perfect for quick snacks!