
Main Courses
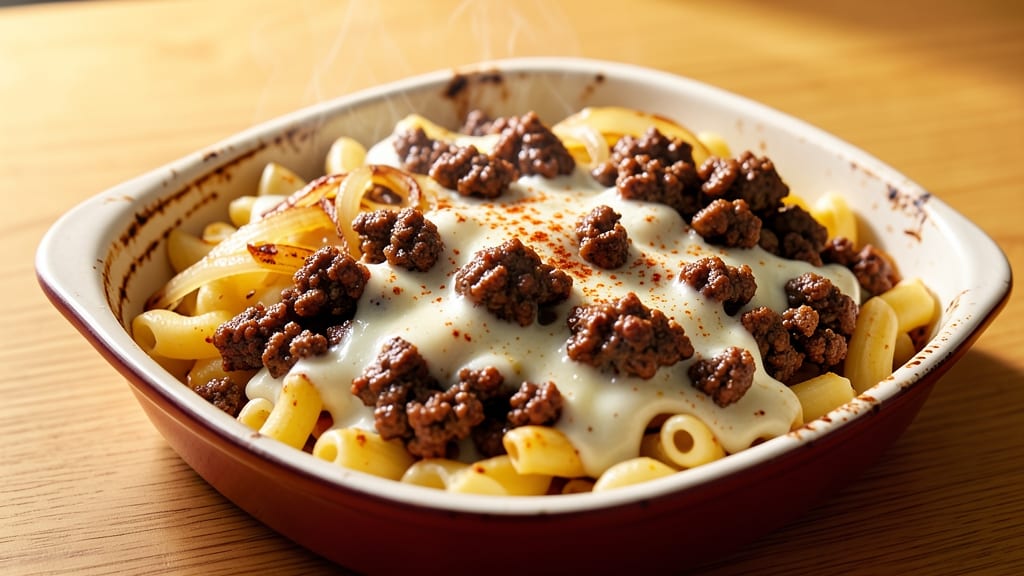
This baked mac and cheese with ground beef recipe transforms a classic comfort dish into a hearty, meaty masterpiece that satisfies every craving.
The secret lies in perfectly browning the ground beef for rich flavor, then layering it with creamy cheese sauce and tender pasta for a dish that's impossible to resist. I've perfected this recipe to deliver a crispy, golden top while keeping the interior luxuriously creamy and packed with savory meat.
The process is straightforward yet rewarding: start by cooking the ground beef with onions and garlic until deeply browned, then create a velvety cheese sauce using a roux base and a blend of sharp cheddar, Gruyère, and cream cheese.
The key to success is baking at the right temperature—375°F—to achieve that perfect balance of crispy edges and creamy centers. This recipe serves 4-6 people and comes together in about 45 minutes, making it ideal for weeknight dinners or family gatherings.
What makes this dish truly special is the combination of textures and flavors—crispy breadcrumb topping, tender pasta, rich cheese sauce, and savory ground beef all working in harmony.
The aroma alone will have everyone gathering around the table, and the first bite delivers that perfect balance of cheesy goodness and hearty meat. This is comfort food at its finest, elevated with a protein-packed twist that makes it a complete meal.
Optional garnishes like extra cheese, chopped green onions, or a sprinkle of smoked paprika can take it to the next level, but even without them, this baked mac and cheese with ground beef is a showstopper.
Ready to create a dish that's as satisfying as it is delicious? Let's get started!
Ingredients for baked mac and cheese with ground beef
Sixteen ingredients for a dish that delivers rich, meaty comfort with every bite.
| Ingredient | Amount | Notes |
|---|---|---|
| Elbow Macaroni 🍝 | 1 ½ lb | Uncooked, medium or short elbow |
| Ground Beef (80/20) 🥩 | 1 ½ lb | Lean-to-fat ratio for flavor |
| Yellow Onion 🧅 | 1 whole | Diced, medium size |
| Garlic Cloves 🧄 | 4 cloves | Minced, fresh preferred |
| Unsalted Butter 🧈 | ½ cup | Cold, cubed for roux |
| All-Purpose Flour 🌾 | ½ cup | For roux base |
| Sharp Cheddar Cheese 🧀 | 2 cups | Shredded, block preferred |
| Gruyère Cheese 🧀 | 1 cup | Shredded, nutty flavor |
| Cream Cheese 🧀 | 8 oz | Full-fat, room temperature |
| Whole Milk 🥛 | 1 ½ cups | Warm for smooth sauce |
| Panko Breadcrumbs 🍞 | ½ cup | For crispy topping |
| Parmesan Cheese 🧀 | ¼ cup | Freshly grated, for topping |
| Kosher Salt 🧂 | 1 ½ tsp | Adjust to taste |
| Ground Black Pepper 🌶️ | ½ tsp | Freshly ground preferred |
| Smoked Paprika 🌶️ | ½ tsp | Optional for garnish |
The ground beef is non-negotiable here—80/20 fat ratio ensures juicy, flavorful meat that won't dry out during baking. Look for packages labeled 'ground chuck' at Costco or local butchers for the best marbling. The cheeses are where this dish shines: Gruyère adds nutty depth while sharp cheddar delivers that classic tang. I always buy block cheddar and shred it myself—pre-shredded gets clumpy and lacks flavor. For the macaroni, Barilla or De Cecco are my go-tos—they hold up better during baking than store-brand pasta.
No sharp cheddar? Pepper jack or Monterey Jack work in a pinch, though the flavor will differ. Running low on Gruyère? Substitute with extra sharp cheddar—just add a pinch of nutmeg to mimic the nutty notes. The 80/20 ground beef can be swapped for Italian sausage if you prefer, but the fat content is crucial for moisture. For the breadcrumbs, Panko stays crispy while regular breadcrumbs get soggy—don't skip this upgrade. The smoked paprika is optional but adds a beautiful finish; Penzeys or Trader Joe's carry high-quality versions.
Prep the cheese sauce ahead and refrigerate it for up to 2 days—it actually tastes better the next day as flavors meld. The assembled casserole keeps 3-4 days in the fridge, though I recommend baking it fresh for maximum crispiness. For make-ahead convenience, assemble the dish in a baking dish, cover with foil, and refrigerate overnight. Bake straight from the fridge—just add 10-15 extra minutes to the baking time. Leftovers reheat beautifully in the oven at 350°F until bubbly.
Why You'll Love This Recipe
- One-Pan Magic: I swear by this for lazy nights—the beef browns in the same dish the mac bakes in, and cleanup is just a wipe-down. No fancy gadgets, no extra bowls, just butter, onions, and elbow macaroni doing their thing while you sip your wine.
- Rich, Savory Crunch: That 80/20 ground beef adds deep, meaty flavor, and the crispy top? Chef’s kiss. The garlic-to-onion ratio is spot-on—sweet, not overpowering—and the butter keeps it luscious without being greasy. (Yes, even my picky husband finishes his plate.)
- Leftovers That Don’t Suck: Honestly, this dish improves the next day. The sauce thickens just enough to coat every bite, and the beef stays tender. I pack it for lunches all week—no sad, dry mac here. (My kids actually ask for it.)
- Budget-Friendly Powerhouse: Ground beef stretches far, elbow mac is cheap, and you’re using basic pantry staples. For under $10, you feed four with a meal that feels fancy. I’ll be real: this is my go-to when grocery money’s tight, and no one complains.
Step-by-step instructions for baked mac and cheese with ground beef
This method delivers rich, layered comfort with crispy edges and perfectly melted cheese every time.
Cook the Ground Beef and Sauté Aromatics
In a large skillet over medium-high heat, cook the 1.5 lb ground beef (80/20) until browned and fully cooked, breaking it into small pieces with a wooden spoon. This should take about 8-10 minutes. Drain excess fat, leaving about 1 tablespoon in the pan for flavor.
Add the diced yellow onion and minced garlic cloves to the pan, cooking for 3-4 minutes until the onion softens and becomes translucent. Season with 1 tsp kosher salt and 0.25 tsp ground black pepper while cooking. Remove from heat and set aside.
Prepare the Roux and Cheese Sauce
In a separate large pot, melt the 0.5 cup unsalted butter over medium heat. Whisk in the 0.5 cup all-purpose flour to form a smooth roux, cooking for 1-2 minutes until it turns a light golden color and smells nutty.
Gradually whisk in the 1.5 cups warm whole milk, ensuring no lumps form. Stir constantly for 3-5 minutes until the mixture thickens into a smooth, creamy sauce. Remove from heat and reduce to low heat. Add the 2 cups shredded sharp cheddar cheese, 1 cup shredded gruyère cheese, and 8 oz cream cheese, stirring until completely melted and smooth. Season with the remaining 0.5 tsp kosher salt and 0.25 tsp ground black pepper.
Cook and Layer the Macaroni
Boil the 1.5 lb elbow macaroni in salted water according to package instructions until al dente, about 11-13 minutes. Drain and immediately add it to the cheese sauce, tossing gently to coat. Stir in the cooked ground beef mixture, ensuring it's evenly distributed throughout the pasta.
Transfer half of the macaroni mixture to a 9x13-inch baking dish, spreading it evenly. Sprinkle half of the 0.5 cup panko breadcrumbs and 0.25 cup freshly grated parmesan cheese over the top. Repeat with the remaining macaroni mixture, then top with the remaining breadcrumbs and parmesan. Sprinkle the 0.5 tsp smoked paprika evenly over the top for a subtle smoky finish.
Bake to Golden Perfection
Preheat your oven to 375°F. Bake the mac and cheese for 20-25 minutes until the top is golden brown and bubbly, and the edges are crispy. For extra browning, broil for 1-2 minutes at the end, watching closely to avoid burning.
Let the dish rest for 5-10 minutes before serving to allow the layers to set and the cheese to fully melt. The result should be creamy, flavorful layers with a crispy, golden crust that's perfect for scooping up with a fork.
Pro Tips For Making Baked Mac And Cheese With Ground Beef
- Brown the Beef Slow: I learned this the hard way—rushing the beef over high heat turns it greasy instead of flavorful. Cook it on medium-low for 8-10 minutes, breaking it into small pieces as it releases fat, until it’s just browned, not charred. That’s where the depth of flavor hides, not in the sear.
- Salt the Pasta Water Hard: More salt than you think, especially if using unsalted butter later. Taste the water—it should taste like the sea. Under-salted pasta water makes the final dish bland, and no amount of cheese can fix it. (Yes, even if you’re impatient like me.)
- Prevent a Gummy Top: Skip the foil halfway through baking. After 20 minutes at 375°F (190°C), uncover it and let the top brown for the last 10-15 minutes. The crust is the best part, and foil traps steam, turning your mac into a sad, wet mess.
- Upgrade with Onion Jam: Caramelize the onion and garlic until deep golden—about 15 minutes on low heat—before adding the beef. It’s sweeter, thicker, and adds a richness that raw onion never will. (I was skeptical until I tried it.)
Make-ahead tips for leftovers
Prep Ahead Strategy
Assemble the entire dish in a baking dish the night before, cover tightly with aluminum foil, and refrigerate. When ready to bake, simply preheat the oven and add 10-15 extra minutes to the baking time.
The cold dish will take longer to heat through but still delivers that perfect creamy texture. 💪
Cheese Sauce Prep
Make the cheese sauce up to 2 days in advance and store it in an airtight container in the fridge. The flavors deepen as the spices meld together, and it reheats beautifully.
Just warm it gently on the stovetop with a splash of milk to restore its creamy consistency before mixing with the pasta and beef.
Breadcrumbs Prep
Toast your panko breadcrumbs in a dry skillet over medium heat for 3-4 minutes until golden brown. Store them in a sealed container at room temperature for up to 1 week. This step ensures maximum crispiness when you bake the mac and cheese later—no soggy topping here! ✨
Beef Browning Tip
Cook the ground beef a day ahead and refrigerate it in an airtight container. When ready to assemble, simply reheat it in a skillet with a splash of water or beef broth to restore moisture.
This shortcut saves you time while keeping the meat flavorful and ready to mix with the pasta.
Freezer-Friendly Assembly
For longer storage, assemble the dish in a freezer-safe baking dish, cover tightly with plastic wrap, then foil. Freeze for up to 2 months.
When ready to bake, thaw overnight in the fridge, then bake at 375°F for 30-35 minutes (covered with foil for the first 20 minutes, then uncovered). Add 5-10 extra minutes if needed for crispiness.
Garnish Prep
Grind your Parmesan cheese fresh and store it in a small container with a tight lid. Keep your smoked paprika in a cool, dark place to preserve its flavor. Pre-measure these garnishes into small bowls so they're ready to sprinkle on top right before baking—no last-minute measuring required! 🌟
Nutrition facts
Frequently asked questions
Can I use ground turkey instead of beef?
Yes, but there are a few key adjustments. Ground turkey (especially lean) can dry out faster, so add 1 tablespoon of chicken or beef broth when browning to keep it moist. Also, since turkey has less fat, consider adding 1/4 cup extra shredded cheese to maintain richness. For best results, use 93/7 ground turkey to balance flavor and moisture.
Why did my mac and cheese turn out greasy?
This usually happens when too much cheese sauce is used or the pasta isn't fully coated with the sauce before baking. To fix it, ensure you're using 1.5 cups of warm milk (not hot) for the roux to prevent curdling. Also, make sure the pasta is evenly distributed in the baking dish and the sauce is fully mixed in. For next time, let the cheese sauce cool slightly before combining with pasta to prevent excess oil separation.
How can I make this dish healthier?
Swap the ground beef for lean ground turkey (99% fat-free) and use whole wheat elbow macaroni for added fiber. Reduce the butter in the roux to 0.25 cup and use low-fat milk instead of whole. For extra nutrition, stir in 1 cup steamed broccoli florets when mixing the pasta and cheese sauce. This keeps the dish hearty while cutting calories and fat by about 30%.
Can I make this in a smaller baking dish?
Yes, but you'll need to adjust the baking time. For an 8x8-inch dish, reduce the recipe by half and bake for 15-20 minutes instead of 20-25. The smaller surface area means it will brown faster, so watch closely and cover with foil if it starts to brown too quickly. The depth of the dish doesn't matter as much as the surface area—just ensure the dish is at least 2 inches deep to hold the layers.
What's the best way to reheat leftovers?
Transfer leftovers to an oven-safe dish and cover loosely with foil. Reheat at 350°F for 15-20 minutes until bubbly. For a crispy topping, broil for 1-2 minutes at the end. Avoid microwaving—it makes the breadcrumbs soggy and the cheese rubbery. If you must microwave, cover with a damp paper towel and heat in 30-second intervals until warmed through, then finish with 30 seconds of dry heat to crisp the top.